2018-04-14 21:00
Today I've got my new 128G USB flash drive from Hong Kong, intending to use it as an additional
encrypted storage. Setting up LUKS volume implies filling all the drive with random data first, to
avoid possible statistical attack. I've plugged USB in, created random data key file, formatted the stick as
LUKS volume, and started feeding it with /dev/zero contents via dd, using LUKS infra as an entropy source
(it's faster than dd'ing /dev/urandom). But 128G is kind'a lot for an usb drive, so, even using this trick
it took several hours. I was wondering if it's really that necessary, so, decided to do some syntheric tests.
There are plenty of tools for binary data and entropy visualisation out there, I was using the
first google hit for that.
case 1:
Empty file, filled with zeros, resembling "factory format".
$ dd if=/dev/zero of=test.img bs=1M count=6
result: entropy-test1.png
case 2:
Adding LUKS header.
$ sudo cryptsetup luksFormat -q -v -d /tmp/keyfile test.img
result: entropy-test2.png
case 3:
Creating filesystem within encrypted container.
$ sudo cryptsetup luksOpen -d /tmp/keyfile test.img test_crypt
$ sudo mkfs.ext4 /dev/mapper/test_crypt
$ sudo cryptsetup luksClose test_crypt
result: entropy-test3.png
case 4:
Filling HALF of the container size with zeros via LUKS, creating FS on top.
$ sudo cryptsetup luksOpen -d /tmp/keyfile test.img test_crypt
$ sudo dd if=/dev/zero of=/dev/mapper/test_crypt bs=1M count=3
$ sudo mkfs.ext4 /dev/mapper/test_crypt
$ sudo cryptsetup luksClose test_crypt
result: entropy-test4.png
case 5 (the right way):
Formatting LUKS, filling ALL the storage vis zeros via LUKS,
killing LUKS header space via /dev/urandom, rebuilding LUKS,
creating FS on top.
$ dd if=/dev/zero of=test.img bs=1M count=6
$ sudo losetup /dev/loop0 test.img
$ sudo cryptsetup luksFormat -q -v -d /tmp/keyfile /dev/loop0
$ sudo cryptsetup luksOpen -d /tmp/keyfile /dev/loop0 test_crypt
$ sudo dd if=/dev/zero of=/dev/mapper/test_crypt
$ sudo cryptsetup luksClose test_crypt
$ sudo dd if=/dev/urandom of=/dev/loop0 bs=512 count=4096
$ sudo losetup -d /dev/loop0
$ sudo cryptsetup luksFormat -q -v -d /tmp/keyfile test.img
$ sudo cryptsetup luksOpen -d /tmp/keyfile test.img test_crypt
$ sudo mkfs.ext4 /dev/mapper/test_crypt
$ sudo cryptsetup luksClose test_crypt
result: entropy-test5.png
Compare:
entropy-test1.png
 |
entropy-test2.png
 |
entropy-test3.png
 |
entropy-test4.png
 |
entropy-test5.png
 |
2017-03-05 18:00
I normally don't do Windows or any other Microsoft stuff per se, except forced.
But sometimes I am forced.
So this is an (academical) example what you normally do if you accidentially find yourself in Windows 7:
D:\tmp> echo using System.Windows.Forms; public class message{static void Main(){MessageBox.Show("You Are Owned","Important",MessageBoxButtons.OK,MessageBoxIcon.Exclamation);}} > trace.log
D:\tmp> c:\Windows\Microsoft.NET\Framework\v3.5\csc.exe /target:winexe trace.log
D:\tmp> trace.exe
2017-02-21 23:00
Never thought I could fill out 2TB of local storage (I am not a multimedia person), but I finally did.
Most of space is used by virtual machines and various lab setups. So, had to go shopping, and found out
WD Red NAS 2TB HDDs are still most silent and price/performance option, so, bought x2.
Short log of expanding existing sw RAID1 + LVM setup with these:
Create second md mirror out of two new disks:
$ sudo mdadm --create --verbose /dev/md1 --level=1 --raid-devices=2 /dev/sdd /dev/sde
in separate terminal watch it sync (you can continue while it does):
$ watch -n 2 cat /proc/mdstat
Personalities : [raid1]
md1 : active raid1 sde[1] sdd[0]
      1953383488 blocks super 1.2 [2/2] [UU]
      [===>.................]  resync = 18.7% (365601920/1953383488) finish=1210.4min speed=21860K/sec
      bitmap: 13/15 pages [52KB], 65536KB chunk
...
add md1 as a new physycal volume for LVM:
extend existing volume group with a new volume:
$ sudo vgextend vg1 /dev/md1
check for logical volume mountpoint usage, stop services and umount:
$ sudo lsof /data
$ sudo /etc/init.d/samba stop
$ sudo /etc/init.d/headlessVM stop
$ sudo umount /data
extend logical volume:
$ sudo lvextend -l +100%FREE /dev/vg1/data
extend partition:
$ sudo e2fsck -f /dev/vg1/data
$ sudo resize2fs /dev/vg1/data
remount (it's in /etc/fstab), and start services:
$ sudo mount /data
$ sudo /etc/init.d/samba start
$ sudo /etc/init.d/headlessVM start
that's it:
$ df -h /data
Filesystem            Size  Used Avail Use% Mounted on
/dev/mapper/vg1-data  3.4T  1.2T  2.1T  36% /data
2016-11-14 12:00
Often being caught in situations when I need serial console to Cisco
equipment and I don't have one, despite caring several capable linux
machines in my pockets, made me do something about it.
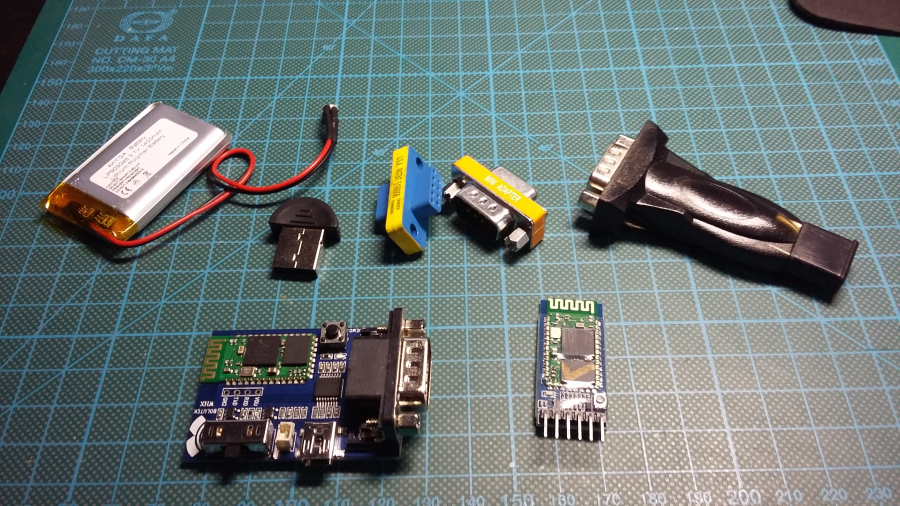
For the experiments, I've got several things:
"DB9" above is actually "DE-9", but "DB9" is used more often.
Install some serial terminal software on the PC (minicom, picocom, nanocom, screen, putty, etc..) - I am going to use picocom.
$ sudo apt-get install -y picocom
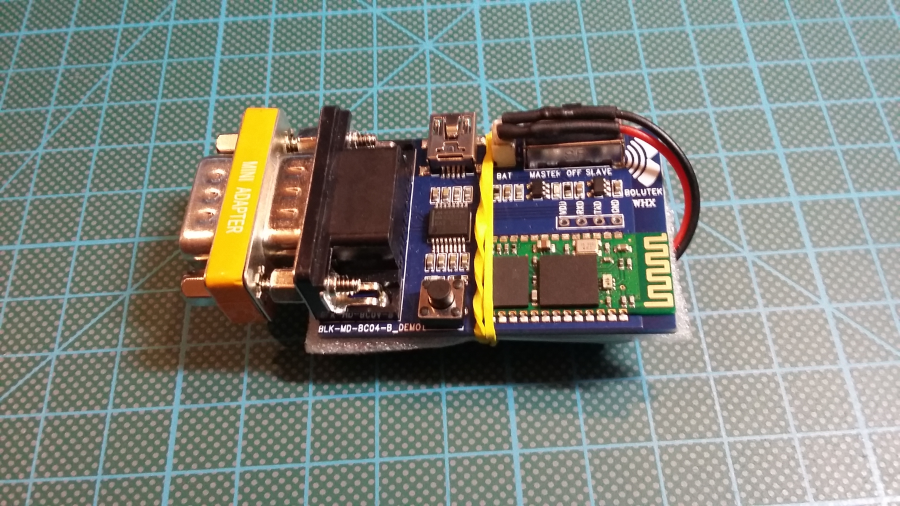
Connect DB9 RS232 Bluetooth adapter via DB9 F-F gender changer to USB Serial adapter. Power the BT board via mini USB cable. Connect
USB serial to PC USB port:

Launch serial terminal on it:
$ dmesg | tail | grep tty
[4505336.859339] usb 3-8.1: FTDI USB Serial Device converter now attached to ttyUSB0

$ picocom -c -b 9600 /dev/ttyUSB0
...
Terminal ready
Turn the switch into slave mode. It will respond to serial. Execute 'AT' command, and get the response:
*** BOLUTEK SPP Bluetooth Module V2.44 Init OK in SLAVE mode!***
*** Please input AT+HELP <cr><lf> to get commands list.      ***
*** For more information, please visit http://www.bolutek.cn ***

+READY
+PAIRABLE

AT
OK
So, if we connect to the module directly via serial, we are talking to BC04-B BT transceiver part.
The list of AT commands is available, but you
can get the list directly from the module by issuing 'AT+HELP' :
AT+HELP
Command              Description
-----------------------------------------------------------------
AT                   Check if the command terminal work normally
AT+RESET             Software reboot
AT+VERSION           Get firmware, bluetooth, HCI and LMP version
AT+HELP              List all the commands
AT+NAME              Get/Set local device name
AT+PIN               Get/Set pin code for pairing
AT+BAUD              Get/Set baud rate
AT+CLEAR             Remove the remembered remote address
AT+LADDR             Get local bluetooth address
AT+RNAME             Get remote device name
AT+DEFAULT           Restore factory default
AT+CMODE             Get/Set connection mode
AT+BIND              Get/Set bind bluetooth address
AT+COD               Get/Set local class of device
AT+IAC               Get/Set inquiry access code
AT+ROLE              Get/Set master or slave mode
AT+STATE             Get current state
AT+SENM              Get/Set security and encryption mode
AT+IPSCAN            Get/Set page and inquiry scan parameters
AT+SNIFF             Get/Set sniff power table parameters
AT+LOWPOWER          Start/Stop low power mode
AT+UARTMODE          Get/Set uart stop bits and parity
AT+ENABLEIND         Enable/Disable Indication print
AT+LSP               List Paired Device List
AT+RESETPDL          Reset Paired Device List
AT+REMOVEPDL         Remove one entry from Paired Device List
AT+SUPERVISION       Get/Set supervision timeout
AT+AUTOINQ           Start/Stop auto inquiry
AT+INQ               Start inquiry
AT+INQC              Cancel ongoing inquiry
(M)AT+AUTOCONN       Start/Stop auto connection
(M)AT+INQM           Get/Set inquiry parameters
(M)AT+CONNECT        Connect to a remote device by BD address
-----------------------------------------------------------------
Note: (M) = The command support master mode only, other commands
support both master and slave mode.
For more information, please visit http://www.bolutek.cn
Copyright@2012 www.bolutek.cn. All rights reserved.
For now, there are only 2 commands relevant to our needs - here we are changing module BT name
from default 'BOLUTEK' to 'BTSC' and pin from default '1234' to max. length '0123456789ABCDEF'.
Unfortunately it will not let us change BT MAC address via AT commands.
AT+NAME
+NAME=BOLUTEK
AT+NAMEBTSC
+NAME=BTSC

AT+PIN
+PIN=1234
AT+PIN0123456789ABCDEF
+PIN=0123456789ABCDEF
OK
Now we are ready to go.
Reassemble the gear: disconnect USB Serial and DB9 gender changer.
Connect Null-Modem adapter, blue Cisco cable and Battery.
IMPORTANT: You need Null-Modem adapter for normal use.
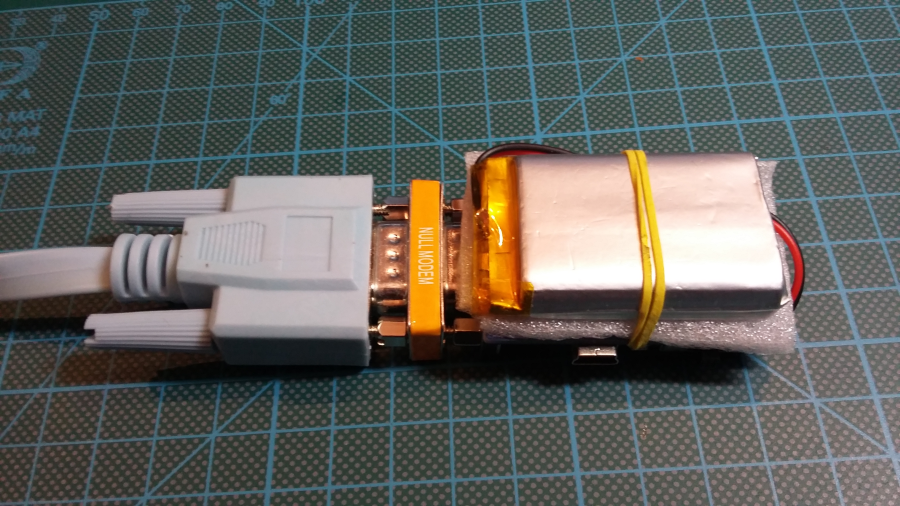
Connect Cisco console cable into some Cisco equipment.
Plug USB BT dongle into PC. Dmesg shows:
[4562811.896635] usb 3-8.1: new full-speed USB device number 127 using xhci_hcd
[4562812.002374] usb 3-8.1: New USB device found, idVendor=0a12, idProduct=0001
[4562812.002376] usb 3-8.1: New USB device strings: Mfr=0, Product=2, SerialNumber=0
[4562812.002377] usb 3-8.1: Product: CSR8510 A10
lsusb detects it as:
Bus 003 Device 127: ID 0a12:0001 Cambridge Silicon Radio, Ltd Bluetooth Dongle (HCI mode)
Install bluetooth support:
$ sudo apt-get install bluetooth
Set dongle address to 00:11:22:33:44:55 if manufacturer supports it:
~$ sudo bccmd -d hci0 psset -s 0 bdaddr 0x33 0x00 0x55 0x44 0x22 0x00 0x11 0x00
Or by an easy tool:
$ cd /tmp
$ wget -U "Mozilla" -O bdaddr.tar.bz2 http://www.petrilopia.net/wordpress/wp-content/uploads/bdaddrtar.bz2
$ tar -xvf bdaddr.tar.bz2
$ cd bdaddr/
$ sudo apt-get install libbluetooth-dev
$ make

$ sudo ./bdaddr 00:11:22:33:44:55
Manufacturer:   Cambridge Silicon Radio (10)
Device address: 00:11:22:33:44:00
New BD address: 00:11:22:33:44:55

Address changed - Reset device now
After reinserting you can see it with a new address:
$ hcitool dev
Devices:
        hci0    00:11:22:33:44:55

$ hciconfig
hci0:   Type: BR/EDR  Bus: USB
        BD Address: 00:11:22:33:44:55  ACL MTU: 310:10  SCO MTU: 64:8
        UP RUNNING PSCAN
        RX bytes:612 acl:0 sco:0 events:37 errors:0
        TX bytes:942 acl:0 sco:0 commands:37 errors:0
Scan for other BT devices and see our Serial module:
$ hcitool scan
Scanning ...
        00:10:20:30:40:50       BTSC
List services:
$ sdptool records 00:10:20:30:40:50
Service Name: SPP Dev
Service RecHandle: 0x10000
Service Class ID List:
  "Serial Port" (0x1101)
Protocol Descriptor List:
  "L2CAP" (0x0100)
  "RFCOMM" (0x0003)
    Channel: 1
Language Base Attr List:
  code_ISO639: 0x656e
  encoding:    0x6a
  base_offset: 0x100
Connect serial device (funny, you don't need any PIN for that):
$ sudo rfcomm connect hci0 00:10:20:30:40:50
Connected /dev/rfcomm0 to 00:10:20:30:40:50 on channel 1
Press CTRL-C for hangup
Launch serial terminal in another terminal session:
$ sudo picocom /dev/rfcomm0
Press 'Enter' - and vuala - you are in Cisco console now:
Bluetooth serial adapter module schematics can be found here.
From the module schematics mentioned above we can see it also has LN2054 battery charger, meaning you can go autonomous with the Li-Po battery, and charge it via Mini-USB when possible.
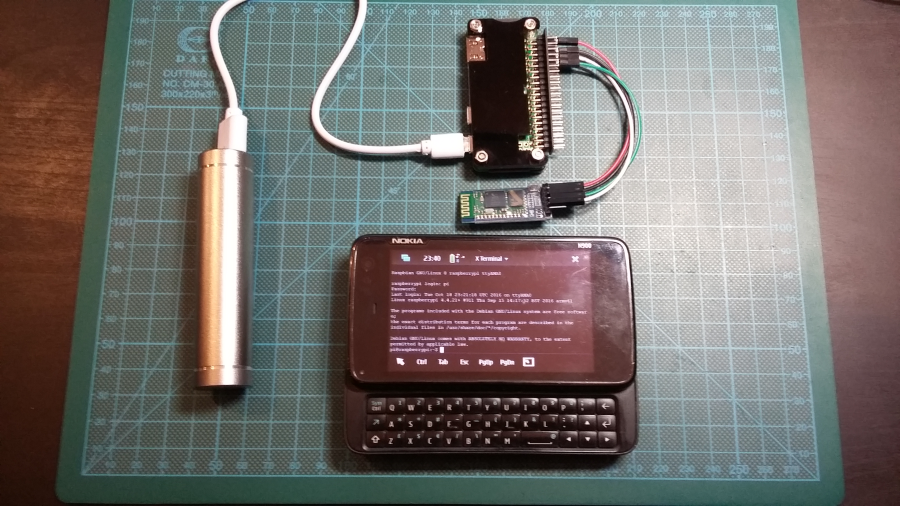
So, after we tested everything with a PC, it's time to do it on a mobile
device, like Nokia N900. I did it in a two steps: first, paired bluetooth
devices via Maemo GUI (whih is actually not necessary in our case), then edited
/etc/bluetooth/rfcomm.conf file, so it contains:
rfcomm0 {
        bind yes;
        device 00:10:20:30:40:50;
        channel 1;
        comment "BTSC";
}
Now, after you enable bluetooth via Maemo GUI, open a terminal, and issue:
Nokia-N900:~# rfcomm connect /dev/rfcomm0
Connected /dev/rfcomm0 to 00:10:20:30:40:50 on channel 1
Press CTRL-C for hangup
Microcom is a part of the busybox-power (note: Ctrl-X to exit):
Nokia-N900:~# microcom -s 9600 /dev/rfcomm0

Router>

BONUS: talking to Raspberry Pi Zero serial console from Nokia N900 via HC-05 Bluetooth RF RS232 TTL Module :
2016-06-14 10:22
Needed a single OS environment, being able to boot on x64 corporate laptop, x86 personal netbook,
and VirtualBox both on corporate Windows and home Linux.
Below is a log of installing i386 Debian jessie on fully encrypted (LVM on LUKS including /boot).
32G Kingston DataTraveler Micro 3.1 USB flash drive happened to be the media.
Installation took place on amd64 Debian jessie.
$ sudo su -
# lsusb  | grep Kingston
Bus 004 Device 003: ID 0951:1666 Kingston Technology

# readlink -e /dev/disk/by-id/usb-Kingston_DataTraveler_3*:0
/dev/sdd
Fill the media with random data. Simple
# dd if=/dev/urandom of=/dev/sdd
would take too long, so can do a trick spotted here -
luks-encrypting it, and then filling it with zeroes, using LUKS as an entropy source which is much faster, and wiping only
LUKS header afterwards.
# dd bs=512 count=4 if=/dev/urandom of=/tmp/keyfile iflag=fullblock
# cryptsetup luksFormat -q -v -d /tmp/keyfile /dev/sdd
# cryptsetup luksOpen -d /tmp/keyfile /dev/sdd sdd_crypt
# dd if=/dev/zero of=/dev/mapper/sdd_crypt
# cryptsetup luksClose sdd_crypt
# dd if=/dev/urandom of=/dev/sdd bs=512 count=20480
# rm /tmp/keyfile
It took less than an hour with 10.0 MB/s average write speed.
Older dd is missing 'status=progress' option, check dd status with 'pkill -USR1 ^dd'.
Now create LUKS volume on USB, LVM on it, swap and root partitions on LVM:
# parted -s /dev/sdd mklabel msdos
# parted -s /dev/sdd mkpart primary 0% 100%
# cryptsetup luksFormat /dev/sdd1
# cryptsetup luksOpen /dev/sdd1 lvm
# pvcreate /dev/mapper/lvm
# vgcreate vg /dev/mapper/lvm
# lvcreate -L 1G vg -n swap
# lvcreate -l +100%FREE vg -n root
# mkswap -L swap /dev/mapper/vg-swap
# mkfs.ext4 /dev/mapper/vg-root
After mounting root partition, final hierarchy looks like this (note UUID's for future use):
# mount /dev/mapper/vg-root /mnt/
# lsblk /dev/sdd -o NAME,RM,SIZE,TYPE,MOUNTPOINT,UUID
NAME          RM  SIZE TYPE  MOUNTPOINT UUID
sdd            1 28.9G disk
└─sdd1         1 28.9G part             08b3e5cd-f54f-4e06-929b-63b3083d4e5d
  └─lvm        0 28.9G crypt            2EZ3oh-4HdZ-jEO1-Y2eL-3kWF-3Arg-wbLNhn
    ├─vg-swap  0    1G lvm              9ac82845-e844-48cd-b792-4f9899c109f1
    └─vg-root  0 27.9G lvm   /mnt       e5a91b19-fb4c-4e0a-b1f0-55e7207b1bcc
Install debian into /mnt via debootstrap as described here:
# apt-get install debootstrap
# debootstrap --arch i386 jessie /mnt http://ftp.debian.org/debian
Do some magic:
# cd /mnt/
# mount -t proc none proc/
# mount -t sysfs sys sys/
# LANG=C.UTF-8 chroot . /bin/bash
# apt-get install makedev
# cd /dev/
# MAKEDEV generic
# exit
# mount -o bind /dev dev/
# LANG=C.UTF-8 chroot . /bin/bash
# echo debian > /etc/hostname
# passwd
# vi /etc/apt/sources.list
deb http://ftp.debian.org/debian jessie main contrib non-free
deb http://security.debian.org/ jessie/updates main contrib non-free

# apt-get update
# apt-get install locales linux-image-686-pae firmware-linux cryptsetup lvm2
# /etc/init.d/irqbalance stop
# dpkg-reconfigure locales
# dpkg-reconfigure tzdata
# vi /etc/fstab
# /etc/fstab: static file system information.
#
# Use 'blkid' to print the universally unique identifier for a
# device; this may be used with UUID= as a more robust way to name devices
# that works even if disks are added and removed. See fstab(5).
#
# <file system>                             <mount point> <type>      <options>         <dump> <pass>
# /dev/mapper/vg-root
UUID=e5a91b19-fb4c-4e0a-b1f0-55e7207b1bcc /             ext4        errors=remount-ro 0       1
# /dev/mapper/vg-swap
UUID=9ac82845-e844-48cd-b792-4f9899c109f1 none          swap        sw                0       0
/dev/sr0                                  /media/cdrom0 udf,iso9660 user,noauto       0       0
# vi /etc/adjtime
0.0 0 0.0
0
UTC
Install, configure and install (heh, yes) grub into MBR of USB device:
# apt-get install grub-pc
# echo 'GRUB_ENABLE_CRYPTODISK=y' >> /etc/default/grub
# echo 'GRUB_CMDLINE_LINUX="cryptdevice=/dev/disk/by-uuid/08b3e5cd-f54f-4e06-929b-63b3083d4e5d:lvm"' >> /etc/default/grub
# grub-mkconfig -o /boot/grub/grub.cfg
# grub-install /dev/sdd
Setup initrd:
# dd if=/dev/urandom of=/luks_keyfile.bin bs=512 count=4
# chmod 000 /luks_keyfile.bin
# cryptsetup luksAddKey /dev/sdd1 /luks_keyfile.bin
Enter any passphrase: (existing pass here)

# vi /etc/initramfs-tools/hooks/crypto_keyfile
#!/bin/sh
cp /luks_keyfile.bin "${DESTDIR}"

# chmod +x /etc/initramfs-tools/hooks/crypto_keyfile

# vi /etc/crypttab
lvm UUID=08b3e5cd-f54f-4e06-929b-63b3083d4e5d /luks_keyfile.bin luks,keyscript=/bin/cat

# update-initramfs -u
Cleanup:
# exit
# umount ./{dev,sys,proc}
# cd
# umount /mnt
# vgchange -a n vg
# cryptsetup luksClose lvm
References: 1, 2, 3.