2015-03-11 22:36
This hotel happened to be conservative one: "Internet access is available. Network cable is required".
So, here is a short log how I converted my netbook into a wireless access point (yes, I do have a network cable):
$ sudo apt-get install hostapd dnsmasq
$ sudo /etc/init.d/dnsmasq stop
$ sudo sed -i 's/^ENABLED=1/ENABLED=0/' /etc/default/dnsmasq

$ sudo mkdir /data/ap

$ sudo tee -a /data/ap/dnsmasq.cfg > /dev/null <<EOF
interface=wlan0
dhcp-range=192.168.111.20,192.168.111.254,255.255.255.0,12h
EOF

$ sudo tee -a /data/ap/hostapd.conf > /dev/null <<EOF
interface=wlan0
driver=nl80211
hw_mode=g
ssid=MyAP
channel=9
wpa=2
wpa_passphrase=MyPassword
wpa_key_mgmt=WPA-PSK
wpa_pairwise=TKIP
rsn_pairwise=CCMP
EOF

$ sudo tee -a /data/ap/ap.sh > /dev/null <<EOF
#!/bin/sh
echo "hostapd"
hostapd -B /data/ap/hostapd.conf
echo "dnsmasq"
dnsmasq -C /data/ap/dnsmasq.cfg
echo "ip"
ifconfig wlan0 inet 192.168.111.1 netmask 255.255.255.0
echo "forwarding"
echo 1 > /proc/sys/net/ipv4/ip_forward
echo "nat"
iptables -t nat -A POSTROUTING -s 192.168.111.0/24 ! -d 192.168.111.0/24 -j MASQUERADE
echo "done"
EOF

$ sudo chmod +x /data/ap/ap.sh
$ sudo /data/ap/ap.sh
Channel selection assisted by Wifi Analyzer.
2015-01-11 23:05
Different architecture system chroot using qemu-user-static and binfmt
hooks is a common way to do (faster) native development of embedded system on desktop/server grade equipment.
Did it several times with several platforms, should be the same with RPi.
Raspbian is Debian, host machine is also Debian. We can use 2 scenarios:
Official Raspbian image approach
I'm on a x86_64 Debian Wheezy
# uname -a
Linux lab0 3.14.16 #1 SMP Sat Aug 9 23:54:07 EEST 2014 x86_64 GNU/Linux
Instal prerequisites:
# apt-get install qemu-user-static kpartx
binfmt-support is installed as a dependancy to qemu-user-static.
Get the latest official raspbian image:
# wget -c http://downloads.raspberrypi.org/raspbian/images/raspbian-2014-12-25/2014-12-24-wheezy-raspbian.zip
# unzip 2014-12-24-wheezy-raspbian.zip
Image has multiple partitions in it, so we need kpartx to operate them:
# kpartx -a -v 2014-12-24-wheezy-raspbian.img
add map loop0p1 (254:7): 0 114688 linear /dev/loop0 8192
add map loop0p2 (254:8): 0 6277120 linear /dev/loop0 122880
Create chroot directory:
# mkdir -p /data/lab/pi/emu/wheezy-raspbian-img
Mount image partitions:
# mount /dev/mapper/loop0p2 /data/lab/pi/emu/wheezy-raspbian-img/
# mount /dev/mapper/loop0p1 /data/lab/pi/emu/wheezy-raspbian-img/boot/
Mount service partitions from host system into chroot directory:
# for d in dev proc sys dev/pts; do mount -o bind /${d} /data/lab/pi/emu/wheezy-raspbian-img/${d}; done
Create a list of relevant mounted filesystems (so we can use df for example):
# egrep "rootfs|boot" /etc/mtab | sed 's/\/data\/lab\/pi\/emu\/wheezy-raspbian-img//' > /data/lab/pi/emu/wheezy-raspbian-img/etc/mtab
Chroot into it:
# chroot /data/lab/pi/emu/wheezy-raspbian-img/
Validate setup (note the architecture change):
# uname -a
Linux lab0 3.14.16 #1 SMP Sat Aug 9 23:54:07 EEST 2014 armv7l GNU/Linux
From within chroot try some stuff:
# apt-get update
qemu: uncaught target signal 4 (Illegal instruction) - core dumped
Illegal instruction
According this
and this
culprit is /etc/ld.so.preload . Comment out "/usr/lib/arm-linux-gnueabihf/libcofi_rpi.so" line:
#/usr/lib/arm-linux-gnueabihf/libcofi_rpi.so
After that everyting works. But we are limited to the partition size of the image:
# df -h
Filesystem           Size  Used Avail Use% Mounted on
rootfs               2.9G  2.2G  533M  81% /
/dev/mapper/loop0p1   56M  9.7M   47M  18% /boot
We want to resize/expand rootfs. First - cleanup:
# umount /data/lab/pi/emu/wheezy-raspbian-img/{proc,sys,dev/pts,dev,boot,.}
# kpartx -d 2014-12-24-wheezy-raspbian.img
Add 5 more gigs to the image (should be enough):
# qemu-img resize 2014-12-24-wheezy-raspbian.img +5G
Image resized.
Rotfs is ext4, not supported by the parted at the moment, so, the only way to resize partition
is delete it via fdisk, and reate a new one with the same start boundaries,
but different size. We can run fdisk directly on an image:
# fdisk 2014-12-24-wheezy-raspbian.img

Command (m for help): p

Disk 2014-12-24-wheezy-raspbian.img: 8645 MB, 8645509120 bytes
255 heads, 63 sectors/track, 1051 cylinders, total 16885760 sectors
Units = sectors of 1 * 512 = 512 bytes
Sector size (logical/physical): 512 bytes / 512 bytes
I/O size (minimum/optimal): 512 bytes / 512 bytes
Disk identifier: 0x000c45c9

                         Device Boot      Start         End      Blocks   Id  System
2014-12-24-wheezy-raspbian.img1            8192      122879       57344    c  W95 FAT32 (LBA)
2014-12-24-wheezy-raspbian.img2          122880     6399999     3138560   83  Linux

Command (m for help): d
Partition number (1-4): 2

Command (m for help): n
Partition type:
   p   primary (1 primary, 0 extended, 3 free)
   e   extended
Select (default p): p
Partition number (1-4, default 2):
Using default value 2
First sector (63-16885759, default 63): 122880
Last sector, +sectors or +size{K,M,G} (122880-16885759, default 16885759):
Using default value 16885759

Command (m for help): p

Disk 2014-12-24-wheezy-raspbian.img: 8645 MB, 8645509120 bytes
255 heads, 63 sectors/track, 1051 cylinders, total 16885760 sectors
Units = sectors of 1 * 512 = 512 bytes
Sector size (logical/physical): 512 bytes / 512 bytes
I/O size (minimum/optimal): 512 bytes / 512 bytes
Disk identifier: 0x000c45c9

                         Device Boot      Start         End      Blocks   Id  System
2014-12-24-wheezy-raspbian.img1            8192      122879       57344    c  W95 FAT32 (LBA)
Partition 1 does not end on cylinder boundary.
2014-12-24-wheezy-raspbian.img2          122880    16885759     8381440   83  Linux

Command (m for help): w
The partition table has been altered!

Syncing disks.
Resize the actuall filesystem (you need to map it to the loop device again):
# kpartx -a -v 2014-12-24-wheezy-raspbian.img
# e2fsck -f /dev/mapper/loop0p2
# resize2fs /dev/mapper/loop0p2
Mount it back and use as per above.
Debootstrap approach
Raspbian is Debian, and we can use debootstrap to create a directory tree for chroot - in this case we are not limited to any image size.
# apt-get install debootstrap
# mkdir raspbian-armhf
# wget http://archive.raspbian.org/raspbian.public.key -O - | apt-key add -
# qemu-debootstrap --keyring /etc/apt/trusted.gpg --arch armhf wheezy raspbian-armhf http://archive.raspbian.org/raspbian
The rest is the same as above. Mount:
# for d in dev proc sys dev/pts; do mount -o bind /${d} /data/lab/pi/emu/raspbian-armhf/${d}; done
Chroot:
Validate:
# uname -a
Linux dom0 3.14.16 #1 SMP Sat Aug 9 23:54:07 EEST 2014 armv7l GNU/Linux
Tune:
# echo "deb http://mirrordirector.raspbian.org/raspbian/ wheezy main contrib non-free rpi" > /etc/apt/sources.list
# wget http://archive.raspbian.org/raspbian.public.key -O - | apt-key add -
# apt-get update
# apt-get upgrade
2015-01-11 10:34
I have a handfull of these:

Model: TL-WIN725N Ver:2.0
IC: 8853A-WIN725N
USB ID: 0bda:8179 Realtek Semiconductor Corp.
Product page: @tplink.com
It uses RTL8188EU chipset, and it is not supported by the latest Raspbian out of the box.
Until I compile mine myself, the lazy approach based on
this list of precompiled binary ones (don't trust them):
Firmware:
$ wget -c https://github.com/lwfinger/rtl8188eu/raw/master/rtl8188eufw.bin
$ sudo install -p -m 644 rtl8188eufw.bin /lib/firmware/rtlwifi/
Driver:
$ wget -c https://dl.dropboxusercontent.com/u/80256631/8188eu-20141107.tar.gz
$ tar -zxvf 8188eu-20141107.tar.gz
$ sudo install -p -m 644 8188eu.ko /lib/modules/$(uname -r)/kernel/drivers/net/wireless
$ sudo depmod -a
2015-01-10 20:45
DS3231 RTC Board arrived from dx.com.


Enable I2C:
Add two lines:
Comment out i2c modules in blacklist
$ sudo vi /etc/modprobe.d/raspi-blacklist.conf
resulting:
#blacklist spi-bcm2708
#blacklist i2c-bcm2708
Load them manually:
$ sudo modprobe i2c-bcm2708
$ sudo modprobe i2c-dev
Install i2c-tools:
$ sudo apt-get install i2c-tools
Locate i2c device:
$ sudo i2cdetect -y 1
     0  1  2  3  4  5  6  7  8  9  a  b  c  d  e  f
00:          -- -- -- -- -- -- -- -- -- -- -- -- --
10: -- -- -- -- -- -- -- -- -- -- -- UU -- -- -- --
20: -- -- -- -- -- -- -- -- -- -- -- -- -- -- -- --
30: -- -- -- -- -- -- -- -- -- -- -- -- -- -- -- --
40: -- -- -- -- -- -- -- -- -- -- -- -- -- -- -- --
50: -- -- -- -- -- -- -- -- -- -- -- -- -- -- -- --
60: -- -- -- -- -- -- -- -- 68 -- -- -- -- -- -- --
70: -- -- -- -- -- -- -- --
Load rtc module:
$ sudo modprobe rtc-ds1307
Make it permanent:
Adding a line:
Init i2c device:
$ sudo bash -c "echo ds1307 0x68 > /sys/class/i2c-adapter/i2c-1/new_device"
Check NTP status:
$ ntpq -p
     remote           refid      st t when poll reach   delay   offset  jitter
==============================================================================
-ns1.telecom.lt  212.59.3.3       2 u   36   64  377    1.678    3.862   1.745
*ntp2.litnet.lt  .GPS.            1 u   28   64  377    2.501    4.168   1.682
+ns2.telecom.lt  212.59.3.3       2 u   62   64  377    1.820    1.874   1.546
+ntp1.litnet.lt  .GPS.            1 u    2   64  377    2.527    3.299   0.921
Check date:
$ date
Sat Jan 10 20:53:58 UTC 2015
Wite system time to RTC:
Validate:
$ sudo hwclock -r
Sat 10 Jan 2015 20:56:14 UTC  -0.162439 seconds
Make it into startup scripts:
Add before "exit 0":
# RTC
echo ds1307 0x68 > /sys/class/i2c-adapter/i2c-1/new_device
sudo hwclock -s
2014-10-05 11:31
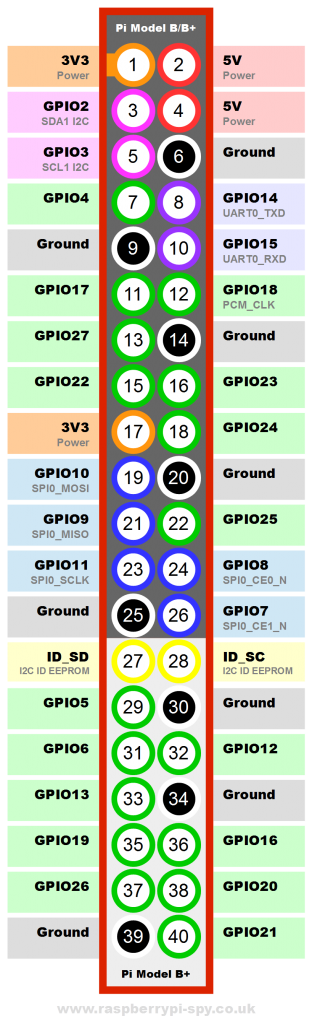
New setup:

There are different ways to reference GPIO pins, so, here is a table,
resembling WiringPi gpio readall output:
 +-----+-----+---------+----+--B Plus--+----+---------+-----+-----+
 | BCM | wPi |   Name  | BL | Physical | BR | Name    | wPi | BCM |
 +-----+-----+---------+----+----++----+----+---------+-----+-----+
 |     |     |     3V3 |  1 |  1 || 2  |  1 | 5v0     |     |     |
 |   2 |   8 |    SDA1 |  2 |  3 || 4  |  2 | 5V0     |     |     |
 |   3 |   9 |    SCL1 |  3 |  5 || 6  |  3 | GND     |     |     |
 |   4 |   7 |   GPIO4 |  4 |  7 || 8  |  4 | TXD0    | 15  | 14  |
 |     |     |     GND |  5 |  9 || 10 |  5 | RXD0    | 16  | 15  |
 |  17 |   0 |  GPIO17 |  6 | 11 || 12 |  6 | GPIO18  | 1   | 18  |
 |  27 |   2 |  GPIO27 |  7 | 13 || 14 |  7 | GND     |     |     |
 |  22 |   3 |  GPIO22 |  8 | 15 || 16 |  8 | GPIO23  | 4   | 23  |
 |     |     |     3V3 |  9 | 17 || 18 |  9 | GPIO24  | 5   | 24  |
 |  10 |  12 | SPIMOSI | 10 | 19 || 20 | 10 | GND     |     |     |
 |   9 |  13 | SPIMISO | 11 | 21 || 22 | 11 | GPIO25  | 6   | 25  |
 |  11 |  14 | SPISCLK | 12 | 23 || 24 | 12 | SPICS0  | 10  | 8   |
 |     |     |     GND | 13 | 25 || 26 | 13 | SPICS1  | 11  | 7   |
 |   0 |  30 |  EEDATA | 14 | 27 || 28 | 14 | EECLK   | 31  | 1   |
 |   5 |  21 |   GPIO5 | 15 | 29 || 30 | 15 | GND     |     |     |
 |   6 |  22 |   GPIO6 | 16 | 31 || 32 | 16 | GPIO12  | 26  | 12  |
 |  13 |  23 |  GPIO13 | 17 | 33 || 34 | 17 | GND     |     |     |
 |  19 |  24 |  GPIO19 | 18 | 35 || 36 | 18 | GPIO16  | 27  | 16  |
 |  26 |  25 |  GPIO26 | 19 | 37 || 38 | 19 | GPIO20  | 28  | 20  |
 |     |     |     GND | 20 | 39 || 40 | 20 | GPIO21  | 29  | 21  |
 +-----+-----+---------+----+----++----+----+---------+-----+-----+
 | BCM | wPi |   Name  | BL | Physical | BR | Name    | wPi | BCM |
 +-----+-----+---------+----+--B Plus--+----+---------+-----+-----+
Where:
- Physical - Board pin number
- BL/BR - Breadbord Left/Right pin row number
- Name - T-Cobbler pin name
- wPi - WiringPi library GPIO pin number
- BCM - Broadcom BCM chip GPIO number
And below is RPi B+ GPIO header pinout details, stolen from
here