2014-08-10 10:05
On a Debian wheezy I needed a newer kernel.
If you just try to install a package from testing on stable, you will run into errors:
# wget -c http://ftp.debian.org/debian/pool/main/l/linux/linux-image-3.14-2-amd64_3.14.13-2_amd64.deb

# dpkg -i linux-image-3.14-2-amd64_3.14.13-2_amd64.deb
dpkg: regarding linux-image-3.14-2-amd64_3.14.13-2_amd64.deb containing linux-image-3.14-2-amd64:
 linux-image-3.14-2-amd64 breaks initramfs-tools (<< 0.110~)
  initramfs-tools (version 0.109.1) is present and installed.

dpkg: error processing linux-image-3.14-2-amd64_3.14.13-2_amd64.deb (--install):
 installing linux-image-3.14-2-amd64 would break initramfs-tools, and
 deconfiguration is not permitted (--auto-deconfigure might help)
Errors were encountered while processing:
 linux-image-3.14-2-amd64_3.14.13-2_amd64.deb
Compiling vanilla kernel the "debian way":
# apt-get build-dep linux-image-`uname -r`
# wget -c https://www.kernel.org/pub/linux/kernel/v3.x/linux-3.14.16.tar.xz
# tar -xvf linux-3.14.16.tar.xz
# cd linux-3.14.16
# make mrproper
# ar p ../linux-image-3.14-2-amd64_3.14.13-2_amd64.deb data.tar.xz  | tar -JxO ./boot/config-3.14-2-amd64 > .config
# make oldconfig
# make -j$(nproc) deb-pkg
# cd ..
# ls -1 *3.14.16*.deb
linux-firmware-image-3.14.16_3.14.16-1_amd64.deb
linux-headers-3.14.16_3.14.16-1_amd64.deb
linux-image-3.14.16_3.14.16-1_amd64.deb
linux-image-3.14.16-dbg_3.14.16-1_amd64.deb
linux-libc-dev_3.14.16-1_amd64.deb
2014-07-26 20:00
BIOS
There is a good MB review @overclockers
but I don't remember myself changing too much defaults in BIOS: Made sure VT-d is "on".
Disabled all USB Legacy support (had issues with booting from USB flash and detecting keyboard/mouse).
Set it to boot from SSD first. Set onboard VGA as primary.
Tried to create hardware RAID out of two WD HDD's, just to
find out it's actually windows-targeted
software-assisted RAID, and linux will see both hard drives individually, even if BIOS shows a single
RAID volume - reverted all RAID related changes in BIOS and RAID config utility (Ctrl+I at boot),
will proceed with software RAID in linux later.
Debian install
At the time of writting I had only a netbook with WinXP onboard, aside the newly built empty PC.
To prepare USB flash drive for Debian install I used
Win32 Disk Imager
with a debian-7.6.0-amd64-netinst.iso.
It's OK to just select an iso in the imager interface and write it to USB, but in this case USB flash becomes
unusable for purposes other than installing Debian. So you can do it the other way around - download boot.img.gz
from current wheezy installer hd-media,
unzip it, and write resulting boot.img to USB flash. Eject device, insert
it back, and you'll see 1G FAT32 partition, where you should also copy debian-7.6.0-amd64-netinst.iso. Just make
sure both installer and iso images are of the same architecture - i386 installer will boot, but will not detect amd64 iso
image.
Grub2 can boot off LVM, so I decided to install Debian enterely on LVM. During setup, selected SSD as
storage, and partitioned it all as single LVM volume group. Took 20G volume for root, 2G for swap,
leaving all the rest for later.
Xen setup
Fixed /etc/apt/sources.list to add contrib and non-free and issued 'apt-get update'.
Then prepared networking:
# apt-get install bridge-utils

# vi /etc/network/interfaces
iface eth0 inet manual

auto xenbr0
iface xenbr0 inet dhcp
        bridge_ports eth0

# /etc/init.d/networking restart
Installed XEN
# apt-get install xen-linux-system xen-tools
Changed Grub boot order, so Xen boots first:
# dpkg-divert --divert /etc/grub.d/08_linux_xen --rename /etc/grub.d/20_linux_xen
# update-grub
IMPORTANT: selected Xen xl toolstack in /etc/default/xen :
# vi /etc/default/xen
TOOLSTACK=xl
Installed Radeon firmware:
# apt-get install firmware-linux-nonfree
if you reboot now, radeon driver will take over pci card, despite BIOS settings that onboard VGA card is boot primary.
To set pci passthrough, first, make sure xen-pciback module loads:
# echo "xen-pciback" >> /etc/modules
Then find out pci id's of Radeon card:
# lspci | grep Radeon
01:00.0 VGA compatible controller: Advanced Micro Devices [AMD] nee ATI Caicos [Radeon HD 6450]
01:00.1 Audio device: Advanced Micro Devices [AMD] nee ATI Caicos HDMI Audio [Radeon HD 6400 Series]
Find out what kernel modules/drivers are in use with these devices:
# lspci -k -s 01:00
01:00.0 VGA compatible controller: Advanced Micro Devices [AMD] nee ATI Caicos [Radeon HD 6450]
        Subsystem: ASUSTeK Computer Inc. Device 047b
        Kernel driver in use: radeon
01:00.1 Audio device: Advanced Micro Devices [AMD] nee ATI Caicos HDMI Audio [Radeon HD 6400 Series]
        Subsystem: ASUSTeK Computer Inc. Device aa98
        Kernel driver in use: snd_hda_intel
Find out USB bus'es:
# lsusb -t
/:  Bus 02.Port 1: Dev 1, Class=root_hub, Driver=ehci_hcd/2p, 480M
    |__ Port 1: Dev 2, If 0, Class=hub, Driver=hub/8p, 480M
        |__ Port 3: Dev 3, If 0, Class=hub, Driver=hub/4p, 480M
/:  Bus 01.Port 1: Dev 1, Class=root_hub, Driver=ehci_hcd/2p, 480M
    |__ Port 1: Dev 2, If 0, Class=hub, Driver=hub/6p, 480M
Identify PCI devices where these USB bus'es connected:
# lsusb | grep "root hub"
Bus 001 Device 001: ID 1d6b:0002 Linux Foundation 2.0 root hub
Bus 002 Device 001: ID 1d6b:0002 Linux Foundation 2.0 root hub

# lsusb -v -d 1d6b:0002 | egrep "^Bus|iSerial "
Bus 001 Device 001: ID 1d6b:0002 Linux Foundation 2.0 root hub
  iSerial                 1 0000:00:1a.0
Bus 002 Device 001: ID 1d6b:0002 Linux Foundation 2.0 root hub
  iSerial                 1 0000:00:1d.0

# lspci -k -s 00:1a.0
00:1a.0 USB controller: Intel Corporation Lynx Point USB Enhanced Host Controller #2 (rev 05)
        Subsystem: ASRock Incorporation Device 8c2d
        Kernel driver in use: ehci_hcd
# lspci -k -s 00:1d.0
00:1d.0 USB controller: Intel Corporation Lynx Point USB Enhanced Host Controller #1 (rev 05)
        Subsystem: ASRock Incorporation Device 8c26
        Kernel driver in use: ehci_hcd
I experimentally found out, that Bus 001 only holds 2 USB2 ports, and Bus 002 holds the rest of
USB2/USB3 ports. So decided to pass Bus 001 to domU, and then pass individual USB ports from dom0 if needed.
To pass PCI device to XEN virtual machine, we need to make sure xen-pciback, not the native device driver is controlling the device.
It's done by creating special modprobe script /etc/modprobe.d/xen.conf
blacklist e1000e
# install e1000e /sbin/modprobe xen-pciback; /sbin/modprobe --first-time --ignore-install e1000e
install usbcore /sbin/modprobe xen-pciback; /sbin/modprobe --first-time --ignore-install usbcore
install radeon /sbin/modprobe xen-pciback; /sbin/modprobe --first-time --ignore-install radeon
install snd_hda_intel /sbin/modprobe xen-pciback; /sbin/modprobe --first-time --ignore-install snd_hda_intel
options xen-pciback permissive=1 hide=(00:19.0)(00:1a.0)(00:1b.0)(01:00.0)(01:00.1)
# pci devices being passed to xen:
# 00:1a.0 - USB controller for bus 001
# 00:1b.0 - Audio device: Intel Lynx Point HDA Controller
# 01:00.0 - VGA [AMD] nee ATI Caicos [Radeon HD 6450]
# 01:00.1 - Audio [AMD] nee ATI Caicos HDMI Audio [Radeon HD 6400 Series]
# 00:19.0 - Ethernet controller: Intel I217-V
This is a final version and it requires some explanations:
- Note, the kernel driver in use for USB controller is
ehci_hcd, but we are substituting usbcore module.
- Something similar is with e1000e for Intel I217-V Ethernet, but I gave up trying to find out why
standard substituting is not working, and just brutally blacklisted the module - another ethernet controller uses different driver.
Now make all our changes to initrd, and reboot:
# update-initramfs -u
# reboot
After reboot we are under Xen already, so, list domains:
# xl list
Name                                        ID   Mem VCPUs      State   Time(s)
Domain-0                                     0 14612     4     r-----      13.8
List PCI devices, available for pass-through:
# xl pci-list-assignable-devices
0000:00:1a.0
0000:00:1b.0
0000:01:00.0
0000:01:00.1
0000:00:19.0
Check status of our LVM:
# vgdisplay -s
  "vg0" 111.79 GiB [20.48 GiB used / 91.30 GiB free]

# lvs -o lv_path,size,devices vg0
  Path               LSize  Devices
  /dev/vg0/dom0_root 18.62g /dev/sda1(0)
  /dev/vg0/dom0_swap  1.86g /dev/sda1(4768)
Create volume for windows install:
# lvcreate --size 50G --name win7_c vg0
  Logical volume "win7_c" created

# lvs -o lv_path,size,devices vg0 | grep -v dom0
  Path               LSize  Devices
  /dev/vg0/win7_c    50.00g /dev/sda1(5244)
Create VM config for windows install:
# vi /etc/xen/win7.cfg
name = 'win7'

kernel = "hvmloader"
builder = 'hvm'
memory = '8192'
vcpus = '4'

disk = ['phy:/dev/vg0/win7_c,hda,w','file:/data/iso/Win7Ult-SP1-x64-en-US.iso,hdc:cdrom,r']
boot='dc'

vif = [ 'mac=00:16:3e:7f:01:01,type=vif,bridge=xenbr0' ]

on_poweroff = 'destroy'
on_reboot = 'restart'
on_crash = 'restart'

acpi=1
apic=1

viridian = '1'
xen_platform_pci='1'
sdl = '0'
vnc = '1'

usb=1
usbdevice='tablet'

pci=[ '00:1a.0','00:1b.0','01:00.0','01:00.1','00:19.0' ]
localtime=1
Setting path for win7 install iso in "disk=" section. Actually, when passing ethernet controller,
vif is not needed - it is legacy from the first time when I realised that virtual network interface is very slow
in this setup. But nether of them are recognised by windows prior installing drivers. So, I did put windows drivers
for Radeon GPU, Intel ethernet, Intel audio, and Xen PV Drivers
(Vista2008x64) on USB flash and installed them aftewards, disabling Xen virtual ethernet device later.
Start VM:
# xl create /etc/xen/win7.cfg
As I mentioned before, I had a netbook with WinXP. From there I ssh'ed to Dom0, forwarding VNC port listened on
localhost to that machine:
$ ssh -L 5900:localhost:5900 user@192.168.1.23
And then launched VNC client against localhost to complete Win7 install procedure and install drivers.
Final touches - setting up software RAID with 2xWD HDDs, adding it to LVM, and setting windows "D:" frive from it:
# apt-get install mdadm
# mdadm --create /dev/md0 --level=1 --raid-devices=2 /dev/sdb1 missing
# mdadm --manage --add /dev/md0 /dev/sdc1
To see status:
# cat /proc/mdstat
Personalities : [raid1]
md0 : active raid1 sdc1[2] sdb1[0]
      1953383296 blocks super 1.2 [2/1] [U_]
      [>....................]  recovery =  2.0% (39782528/1953383296) finish=200.2min speed=159264K/sec

unused devices: <none>
You can work with the mirror while it's syncing, when it's done it will look like this:
# cat /proc/mdstat
Personalities : [raid1]
md0 : active raid1 sdc1[2] sdb1[0]
      1953383296 blocks super 1.2 [2/2] [UU]

unused devices: <none>
LVM:
# pvcreate /dev/md0
# vgcreate vg1 /dev/md0
# vgdisplay -s vg1
  "vg1" 1.82 TiB  [0         used / 1.82 TiB free]

# lvcreate --size 200G --name win7_d vg1
Final volumes list at this point:
# lvs -o lv_path,size,devices
  Path               LSize   Devices
  /dev/vg0/dom0_root  18.62g /dev/sda1(0)
  /dev/vg0/dom0_swap   1.86g /dev/sda1(4768)
  /dev/vg0/win7_c     50.00g /dev/sda1(5244)
  /dev/vg1/win7_d    200.00g /dev/md0(0)
Now you can attach a new disk to live VM like this:
# xl block-attach win7 phy:/dev/vg1/win7_d hdb w
And edit VM config /etc/xen/win7.cfg later on like this:
#disk = ['phy:/dev/vg0/win7_c,hda,w','file:/data/iso/Win7Ult-SP1-x64-en-US.iso,hdc:cdrom,r']
#boot='dc'
disk = ['phy:/dev/vg0/win7_c,hda,w','phy:/dev/vg1/win7_d,hdb,w']
boot='c'
The last thing to do is connecting KVM to respected VGA and USB ports, so you can switch between linux Dom0 and windows DomU.
2014-07-25 15:32
It has been a long time since I had a stationary PC.
The idea is to build a single physical machine, capable of running
several operating systems simultaneously, each of them having direct
access to its hardware. This task is achievable with
Xen hypervisor,
using PCI passthroug.
3 VMs are planned:
- Dom0 Linux - Host OS, having direct access to all hardware, used as primary Linux machine. Should use MB onboard VGA, one of USB controllers for keyboard/mouse, and one of gigabit Ethernet controllers. Debian Wheezy.
- DomU HVM Win7 - HVM (fully virtualised) guest, with VT-d PCI pass-throug for secondary VGA, second USB controller for keyboard/mouse, and second gigabit Ethernet controller. Microsoft Windows 7.
- DomU PV Linux - Paravirtualised Linux guest, running headless (no pass-through and access to phisical VGA or keyboard/mouse), acting as server. Debian Wheezy.
Both VGA adapters and USB controllers connected to KVM, to share single monitor,keyboard and mouse.
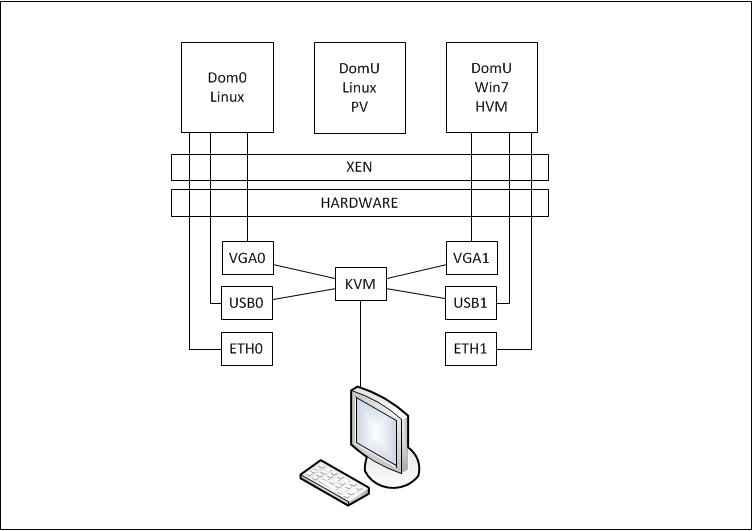
Hardware requirements: Intel VT-d / IOMMU support
in CPU, Motherboard, BIOS and GPU.
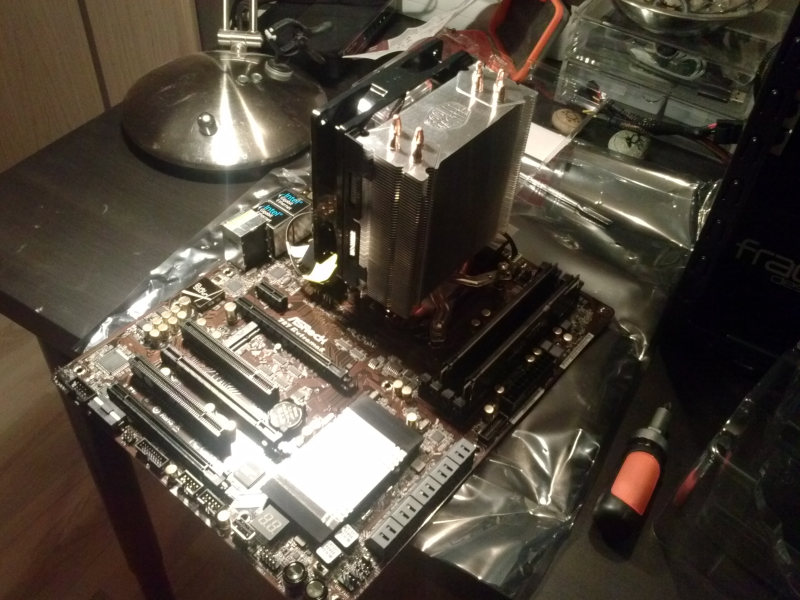
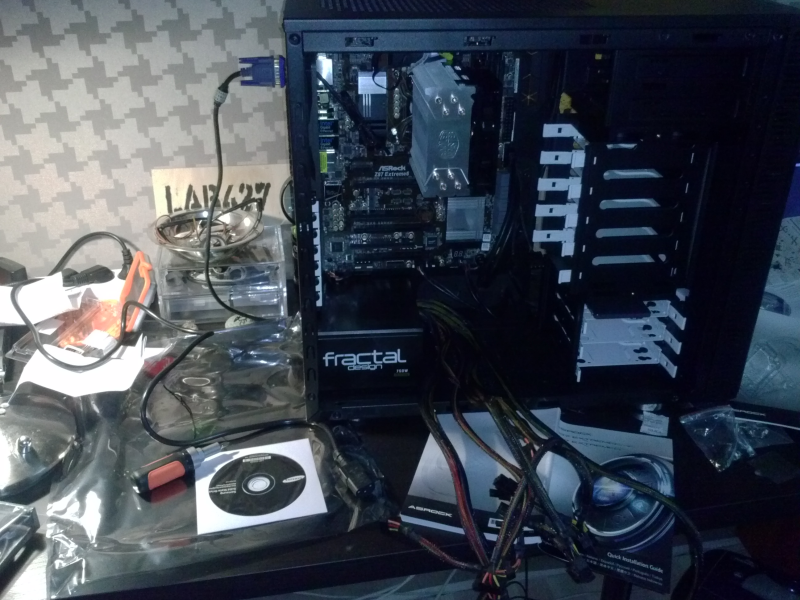
Parts (list was influenced heavily by local availability):
- MB: ASRock Z87 EXTREME6 (link)
- CPU: Intel Core i5-4570, Quad Core, up to 3.60GHz, 6MB cache, LGA1150, 84W (link)
- RAM: DDR3 Kingston HyperX Black 16GB (2x8GB) (link)
- CASE: Fractal Design Define R4 Black Pearl (link)
- PSU: Fractal Design Integra R2 750W (link)
- CPU cooler: Cooler Master Hyper 212 Evo (link)
- SSD: Samsung 840 Evo 120GB SATA3, 540/410MBs, 7mm (link)
- HDD: 2x WD Red WD20EFRX 3.5" 2TB SATA3 64MB IntelliPower (link)
- GPU: Asus AMD Radeon HD6450 EAH6450 SILENT/DI/1GD3(LP) (link)
- KVM: Edimax EK-UAK2 2 Ports USB KVM Switch (link)
Planning:
- some high-end GPU to play with math/crypto
Assembling:
2014-05-02 16:47
Prereq:
# apt-get install davfs2
# mkdir -p /mnt/dav
Test:
# mount -t davfs https://server.net.lab/dav /mnt/dav
Please enter the username to authenticate with server
https://server.net.lab/dav or hit enter for none.
  Username: davuser
Please enter the password to authenticate user davuser with server
https://server.net.lab/dav or hit enter for none.
  Password:
/sbin/mount.davfs: the server certificate is not trusted
<...>
You only should accept this certificate, if you can
verify the fingerprint! The server might be faked
or there might be a man-in-the-middle-attack.
Accept certificate for this session? [y,N] y

# mount | grep /mnt/dav
https://server.net.lab/dav on /mnt/dav type davfs (rw,nosuid,noexec,nodev,_netdev)

# umount /mnt/dav/
/sbin/umount.davfs: waiting while mount.davfs (pid 5996) synchronizes the cache .. OK
Add server to the fstab:
# echo "https://server.net.lab/dav /mnt/dav davfs noauto,user 0 0" >> /etc/fstab
Add dav servers' credentials:
# echo "/mnt/dav davuser davpass" >> /etc/davfs2/secrets
Get self-signed cert pem, and modify cfg t use it:
# echo | openssl s_client -connect server.net.lab:443 2>/dev/null | openssl x509 > /etc/davfs2/certs/server.pem
# grep ^servercert /etc/davfs2/davfs2.conf
servercert server.pem
Mount:
2014-02-04 01:20
The other day I've got a $10 gift-card code from DX.
Didn'n need anything special, so decided to go for some random stuff, and ended up ordering 4
relay modules, $2.40 each then. They arrived:

On the control side, there are 3 pins, labeled +, - and S. On the load side - NO (Normal Open),
central common not labeled, and NC (Normal Closed).
Connection schematics:

First, connected GPIO part:

On the RPi:
$ echo 4 > /sys/class/gpio/export
$ echo "out" > /sys/class/gpio/gpio4/direction
$ echo "1" > /sys/class/gpio/gpio4/value
$ echo "0" > /sys/class/gpio/gpio4/value
Relay LED goes on/off and it clicks when setting values. Worx. Time to connect the load:

$ echo "1" > /sys/class/gpio/gpio4/value
Result:

The same can be done with WiringPi. Install:
$ git clone git://git.drogon.net/wiringPi
$ cd wiringPi
$ ./build
Use:
$ gpio reset
$ gpio -g mode 4 out
$ gpio -g write 4 1
$ gpio -g write 4 0
WiringPi can address pins both by GPIO number as above, or by pin number:
Status:
$ gpio readall
+----------+-Rev2-+------+--------+------+-------+
| wiringPi | GPIO | Phys | Name   | Mode | Value |
+----------+------+------+--------+------+-------+
|      0   |  17  |  11  | GPIO 0 | IN   | Low   |
|      1   |  18  |  12  | GPIO 1 | IN   | Low   |
|      2   |  27  |  13  | GPIO 2 | IN   | Low   |
|      3   |  22  |  15  | GPIO 3 | IN   | Low   |
|      4   |  23  |  16  | GPIO 4 | IN   | Low   |
|      5   |  24  |  18  | GPIO 5 | IN   | Low   |
|      6   |  25  |  22  | GPIO 6 | IN   | Low   |
|      7   |   4  |   7  | GPIO 7 | OUT  | High  |
|      8   |   2  |   3  | SDA    | IN   | High  |
|      9   |   3  |   5  | SCL    | IN   | High  |
|     10   |   8  |  24  | CE0    | IN   | Low   |
|     11   |   7  |  26  | CE1    | IN   | Low   |
|     12   |  10  |  19  | MOSI   | IN   | Low   |
|     13   |   9  |  21  | MISO   | IN   | Low   |
|     14   |  11  |  23  | SCLK   | IN   | Low   |
|     15   |  14  |   8  | TxD    | IN   | Low   |
|     16   |  15  |  10  | RxD    | IN   | Low   |
|     17   |  28  |   3  | GPIO 8 | IN   | Low   |
|     18   |  29  |   4  | GPIO 9 | IN   | Low   |
|     19   |  30  |   5  | GPIO10 | IN   | Low   |
|     20   |  31  |   6  | GPIO11 | IN   | Low   |
+----------+------+------+--------+------+-------+
Automation - relay.sh:
#!/bin/bash

# set GPIO pin 4 to OUT
gpio -g mode 4 out

while true; do
# read state
STATE=`gpio -g read 4`
case $STATE in
  0)
    echo "state: OFF, switching to ON"
    gpio -g write 4 1
    ;;
  1)
    echo "state: ON, switching to OFF"
    gpio -g write 4 0
    ;;
esac
sleep 1
done